Gluten-Free Hamburger Buns with Sesame Seeds
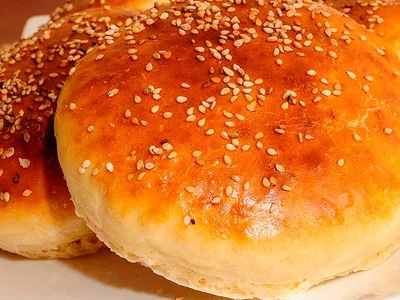
These soft, pillowy gluten-free hamburger buns deliver the tender crumb and structure you expect from quality burger bread without wheat flour. Made with a blend of gluten-free flour, warm milk, and water, the dough rises twice for maximum volume and light texture. The addition of butter creates richness while eggs bind everything together, resulting in buns that hold up to toppings without crumbling. A final egg wash and sesame seeds add visual appeal and subtle nutty flavor. Perfect for anyone managing celiac disease or gluten sensitivity who refuses to compromise on burger quality, these buns work equally well for sandwiches and sliders. Serve them fresh the same day, slightly warm, to experience their full soft texture. This recipe proves gluten-free baking requires patience and technique, not compromise.
Ingredients
Instructions
- 1
Sift gluten-free flour into a bowl, add baking powder and sugar, and set aside.
- 2
Beat one egg and reserve the other, then mix the beaten egg with warm milk.
- 3
Make a well in the center of the flour mixture and pour in the egg-milk mixture, stirring well to combine.
- 4
Add warm water gradually while mixing until all ingredients are incorporated.
- 5
Transfer dough to a clean surface and knead for 10 to 12 minutes until it reaches a sticky texture.
- 6
Add butter and salt, then knead again until the dough becomes uniform and forms a ball.
- 7
Place in a covered container and let rest until it doubles in size, approximately one hour and thirty minutes.
- 8
Knead for 10 minutes to release air pockets, shape into a ball, and let rise again until doubled.
- 9
Divide dough into portions, shape into buns, and place on a baking sheet lined with parchment paper.
- 10
Cover with a kitchen towel and let rest for one hour.
- 11
Preheat the oven to 200 C while the final rise happens.
- 12
Beat the reserved egg and brush a light coating over each bun, then sprinkle with sesame seeds.
- 13
Bake for 12 to 15 minutes until golden.
- 14
Remove from the oven and let cool completely before serving.
Tips
Gluten-free dough is naturally stickier than wheat-based dough. Resist adding more flour during kneading, as this creates dense buns. The stickiness is necessary for the tender crumb you're after.
Warm liquids activate the yeast and help develop gluten-free flour's structure. Use a thermometer if possible to ensure milk and water are tepid, not hot, which kills yeast.
The two rises are non-negotiable for gluten-free baking. They give the dough time to hydrate fully and develop flavor. Don't rush or skip the second rise.
Good to Know
Store cooled buns in an airtight container at room temperature for up to 2 days. For longer storage, wrap individually and freeze for up to 3 months. Thaw at room temperature before serving.
Prepare through the first rise, refrigerate overnight, then bring to room temperature and proceed with shaping and second rise. Alternatively, freeze shaped, unbaked buns and bake directly from frozen, adding 5-7 minutes to baking time.
Serve warm or at room temperature on the same day they are baked for optimal texture. Split and toast lightly if desired. Pair with your favorite burger fillings and condiments.
Common Mistakes
Do not add extra flour during kneading to avoid dense, dry buns—gluten-free dough is supposed to be sticky.
Do not skip the second rise to avoid flat, heavy buns that won't hold together.
Do not use hot water or milk to avoid killing the yeast and preventing proper fermentation.
Substitutions
Dairy-Free Swaps
Vegan Options
Gluten-Free Swaps
conf:5
General Alternatives
FAQ
Can I make these buns ahead and freeze them?
Yes. Shape the dough and freeze on a baking sheet before the final rise, then transfer to freezer bags. Bake from frozen, adding 5-7 minutes to the baking time. Or bake fully, cool, wrap individually, and freeze for up to 3 months.
What if I don't have gluten-free flour?
You can use all-purpose wheat flour at a 1:1 ratio. The recipe will be slightly less dense and may not require the full resting time. However, the result will no longer be gluten-free. Consider blending all-purpose flour with a small amount of xanthan gum for texture closer to the original.
How long do these buns stay fresh?
Best eaten the same day they're baked. Store cooled buns in an airtight container for up to 2 days at room temperature. For longer storage, freeze individually wrapped buns for up to 3 months. Thaw at room temperature before serving.